
Building your own Discord server may seem like a complicated task but it is quite easy to do. You can set one up in minutes and slowly customize it over time. We provide a comprehensive guide to set up the most basic, barebones server so you can get a hang of it and then customize it.
Table of Contents
Before You Start
Before you start building a server from scratch, consider what purpose it will serve. Are you creating a server for a group of friends or a community? Servers for a small group of friends aren’t complicated. You don’t need to moderate heavily or add special bots to manage the crowd. There is no need to create a large number of channels if you’re just a group of people chatting.

However, if you are building a server with a purpose and want to invite a lot of people, consider planning your server layout carefully. Think about what kind of channels you will need and how will you manage the people on your server.
Let us begin!
How to Create a Discord Server
You can create an entire server with a click of a few buttons. There are two ways to approach this. You can either make one from scratch or use a template for it. Let’s first look at how to make a server from a template.
1. How to Create a Discord Server from a Template
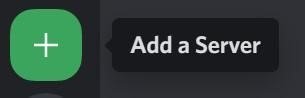
Step 1. To create any server, you need to click on the ‘+’ icon at the bottom of your server list on the left side of your screen.

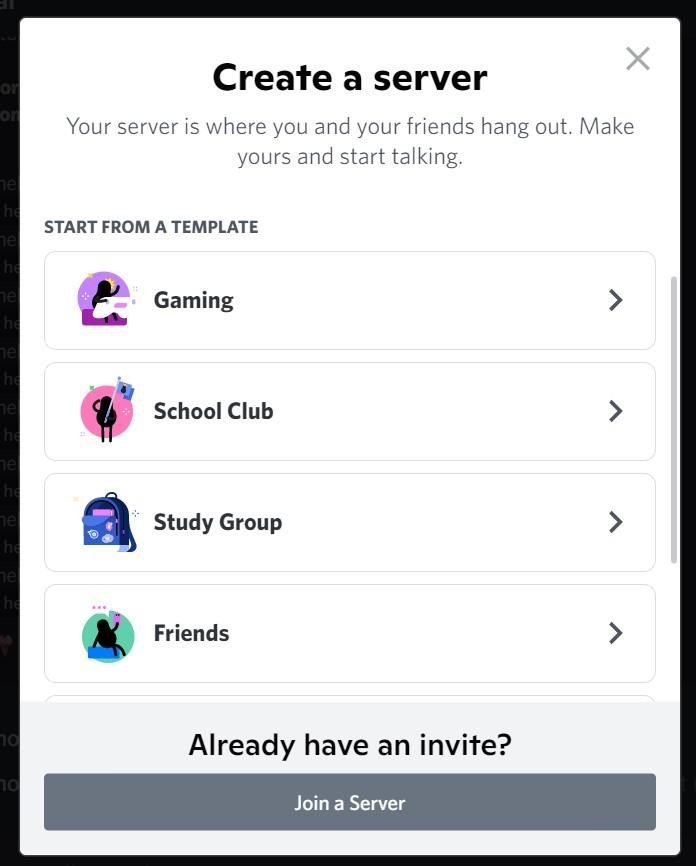
Step 2. When you click on the icon, you will get a pop-up box to select how you want to create a server. You have the option of creating it from scratch or using one of the templates provided by Discord.

Step 3. Discord offers six different types of template options like the ones mentioned below. Think about your server’s purpose and choose a template suitable for it. For example, if you want to create a community of people who like to draw and sketch, consider using the ‘Artists & Creators’ template.
- Gaming
- School Club
- Study Group
- Friends
- Artists & Creators
- Local Community
Step 4. You will then be prompted to name your server and add a picture to act as the server icon. Give your server an appealing name and icon to attract more people to it. We recommend keeping the server’s purpose in mind when you name it.

Step 7. Once you click on ‘Create,’ Discord will automatically create a server with a few channels and categories already in place. You can customize this server, rename the channels, and expand it as per your requirements. There is no need to stick with the template design.
As you can see from the screenshot below, there is a list of channels and categories already in place.
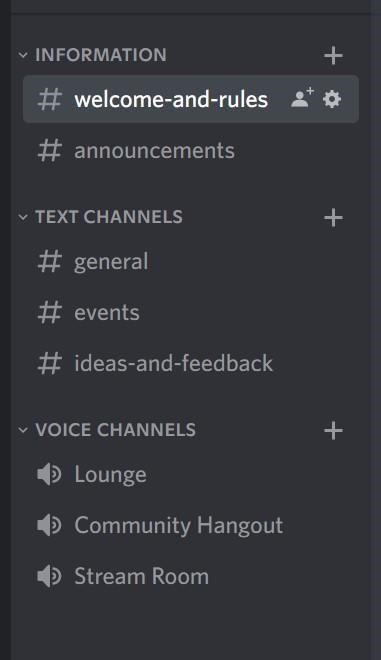
But if you don’t want to mess with the server layout, you can still use it as it is and enjoy connecting with your friends.
2. How to Create a Discord Server from Scratch
If you don’t think any of the server templates suit your requirements, you have the option to create your server from scratch. We explain the steps you need to consider below:
Step 1. To create a server from scratch, you need to click on the ‘+’ icon at the bottom of your server list on the left side of your screen.
Step 2. When you click on ‘Add a Server,’ there will be a pop-up box with options to create a server or choose a template. Choose ‘Create My Own’ from the options provided.

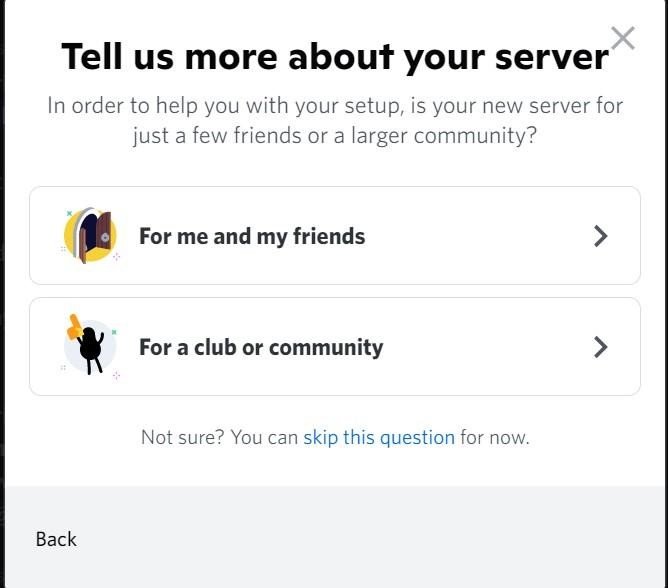
Step 3. When you click on the option, Discord will ask you to choose whether the server is for you and your friends or a club and community. There is a difference between community and personal servers. Community servers provide better moderation and promotional tools to help you manage a large audience.
For the sake of this demonstration, we will choose the ‘For me and my friends’ option. You can also skip this option and decide whether you want to create a community server at a later date. Discord will choose ‘for me and friends’ as a default.
We will discuss what Community Server is and what makes it different in a different post.
Step 4. The next step is to give your server a name and logo. This ensures your server will stand out and look unique. If you want to draw more people to your space, branding your server properly will help.
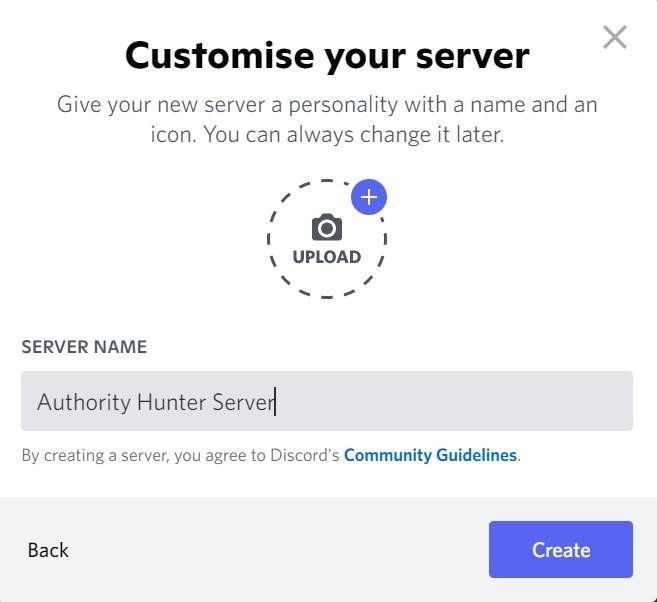
Step 5. Click ‘Create’ to create the basic server. It will look something like this without a template in place:
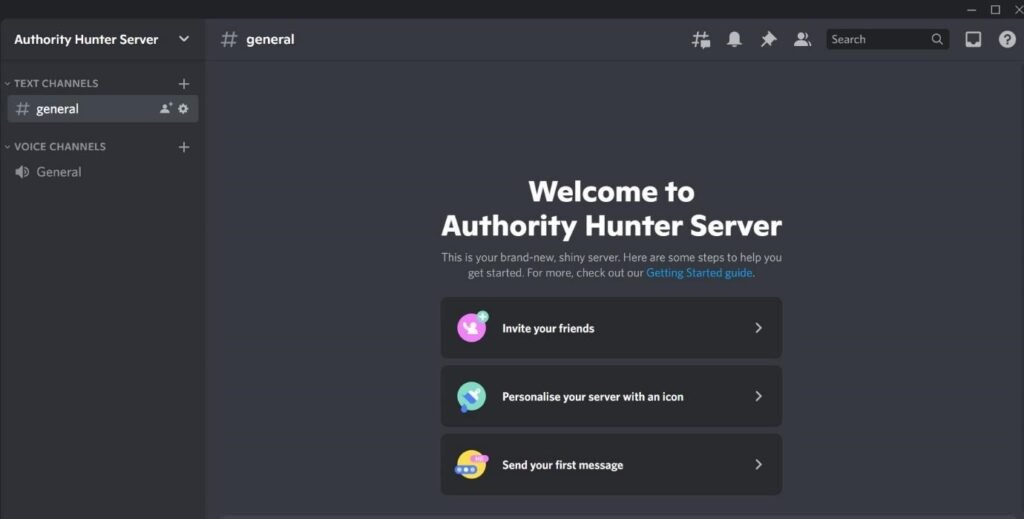
Now you have the bare-bones layout of a server ready. At this stage, the server is usable and you can still invite your friends or connections to join. However, it is a good idea to customize it and change the layout to suit your server’s purpose or your requirements.
How to Customize Your Discord Server
Customizing a server is the fun part. Most people love to tinker with different features and bots until they have a layout they adore. There are many ways to customize the server but we will again stick with the basics for this part.
1. How to Create and Assign Roles in Your Discord Server
Creating channels and categories is fairly straightforward but before going into that, it is a good idea to learn how to create and assign roles. Roles can help you manage access to different parts of your server. Fortunately, this is very easy and we explain how to do it:
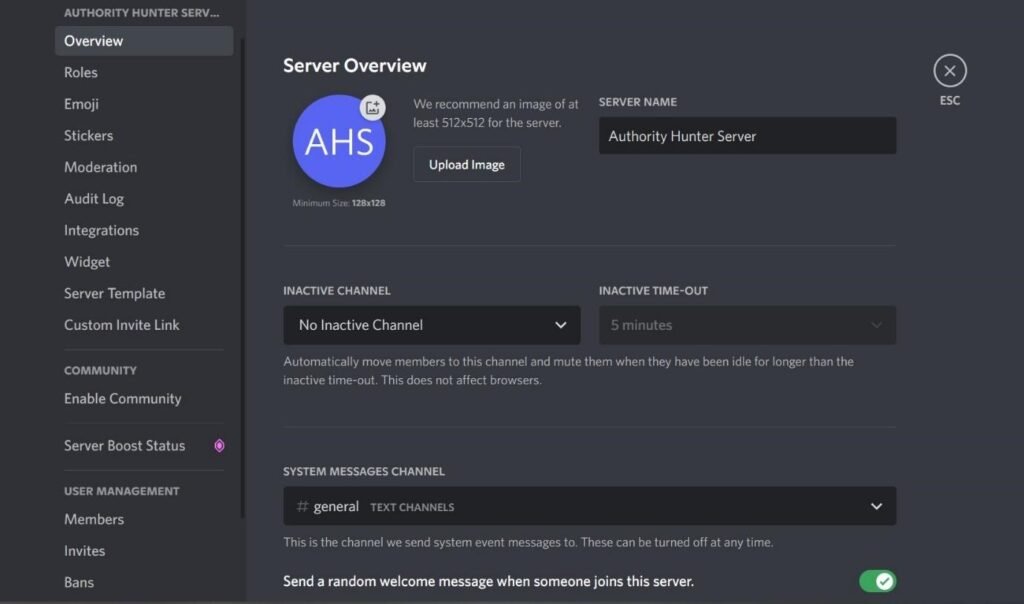
Step 1. Click on your Server name and access the drop-down menu. Then click on ‘Server Settings’ from the menu options.
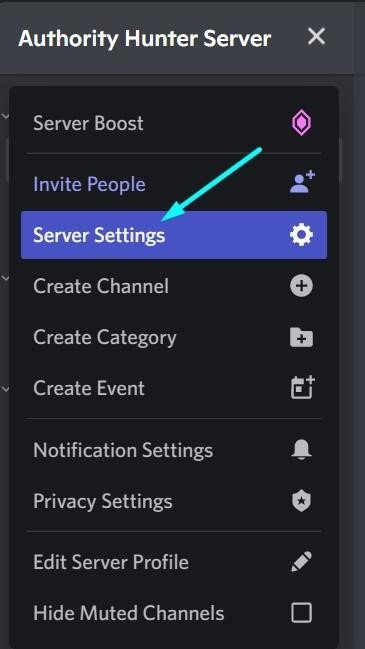
Step 2. When you click on the Server Settings option, you will get access to your server management page. You can manage the entire server from here, including members, channels, categories, and more. However, for this section, let’s focus on the ‘Roles’ option.
Click on the ‘Roles’ option at the top of the menu on the left side of your screen.
Step 3. On the ‘Roles’ page, you will get the option to create, manage, and give different permissions to roles.
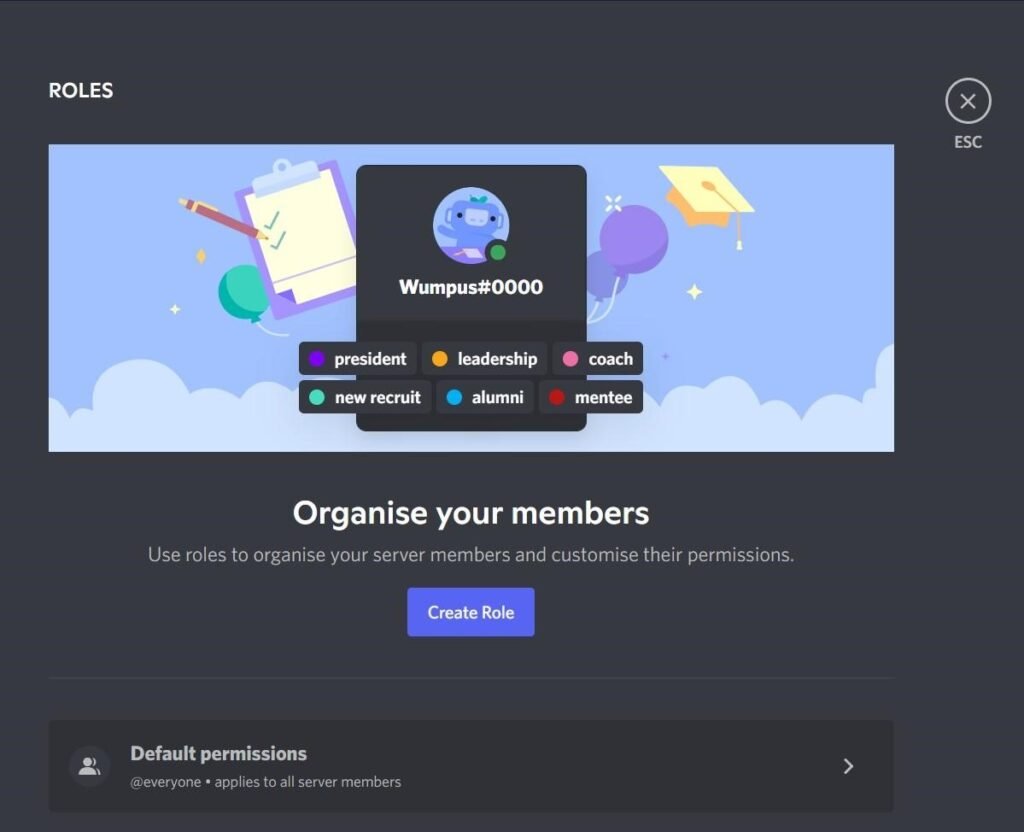
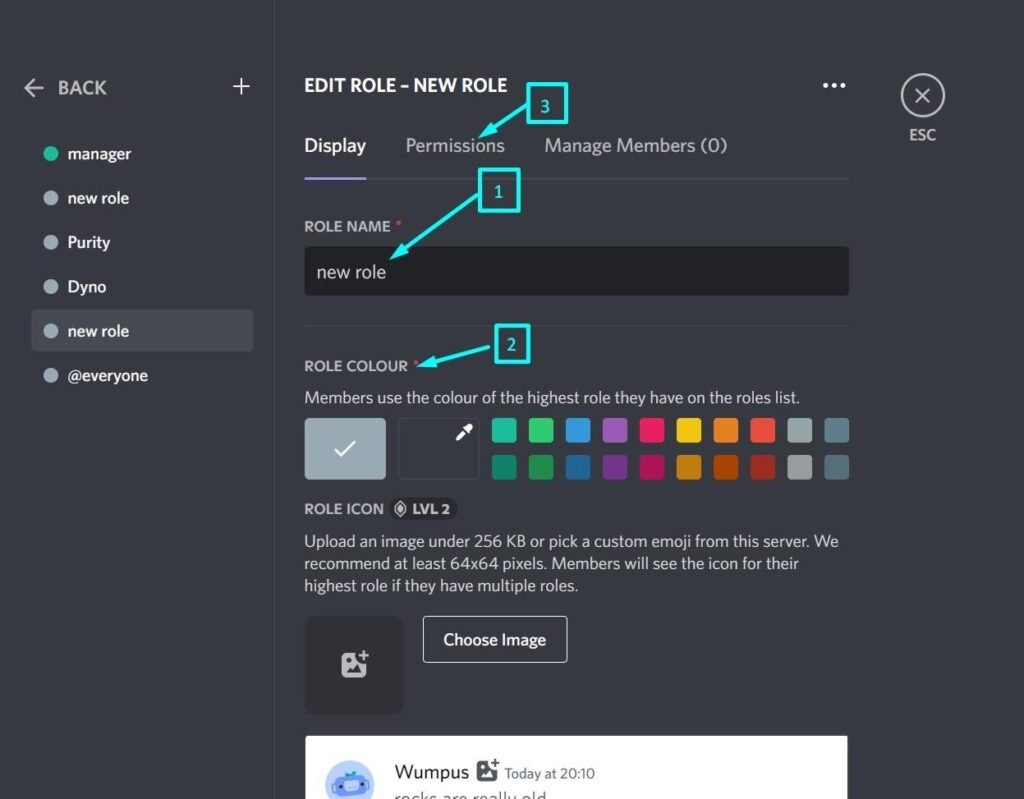
Step 4. Create a Role by clicking on the ‘Create Role’ button. When you click, Discord will open the page to help you manage the role as shown below. While creating a role, you need to:
- Assign a name to the role, which can be anything that indicates a purpose. For example, you can have roles like Manager, Team Lead, HR Officer, IT Whiz, Trainee, etc. The options when it comes to creating roles are unlimited.
- The next step is to assign a role color to your role, which can be anything you like from the options provided or custom color.
- The next step is to assign permissions to the role. We will explain this in detail in the next point.
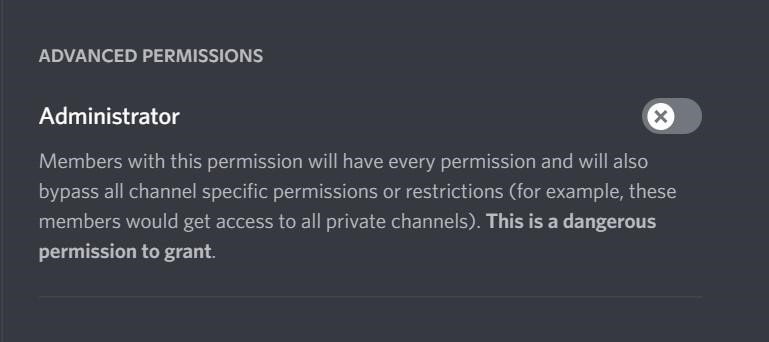
Step 5. Assign Permissions to a Role to control access and make it easier for multiple tiers of members on your server. Go through the list of permissions carefully
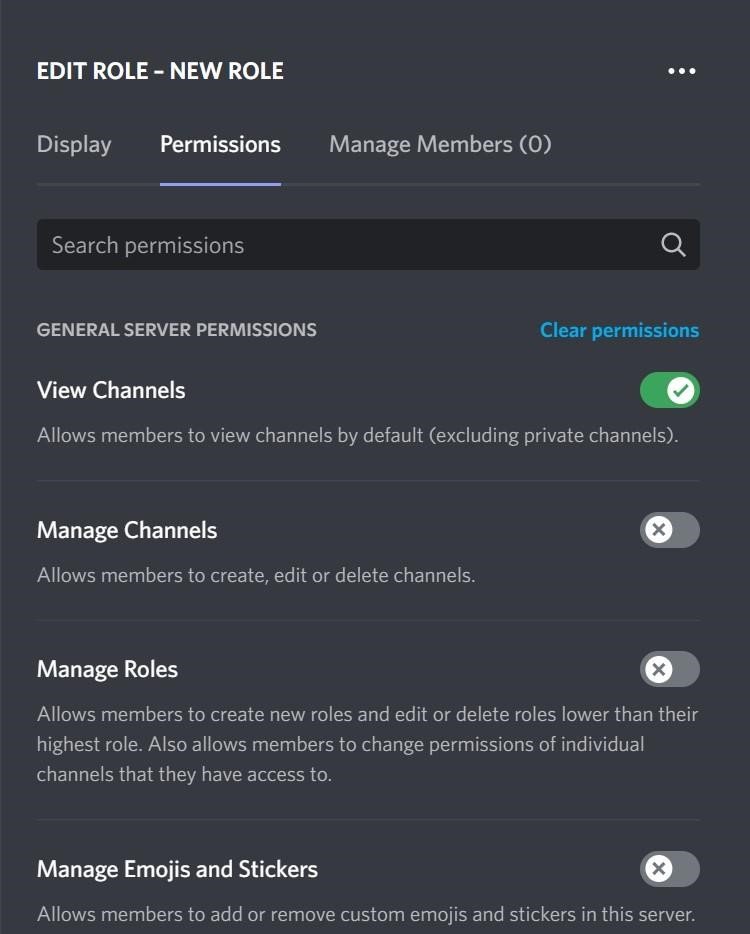
The most important permission to consider is the Administrator’s permission. Do not grant new or unknown members of your server this role because they will be able to change important server settings without your consent. This permission should only be given to people you trust.
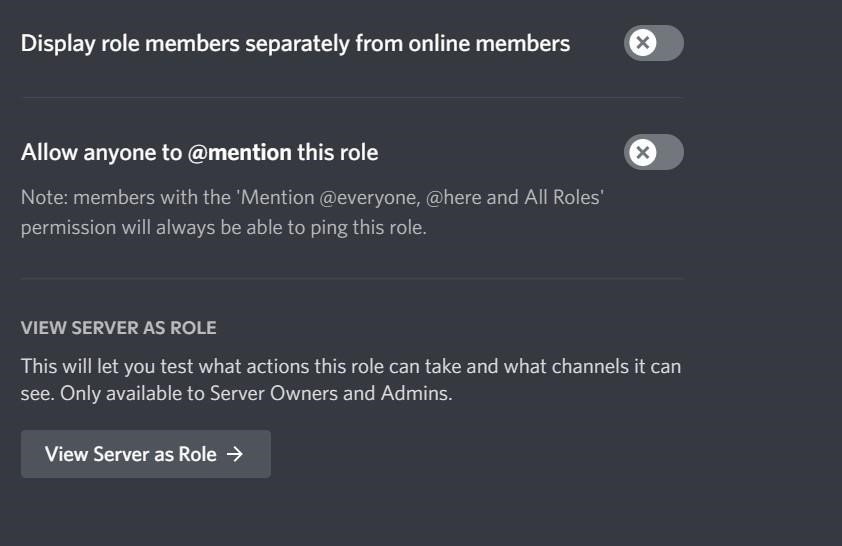
Step 6. You can also customize the appearance of the role in the member’s list by separating people by their roles. Every role will appear as a different category and members belonging to that role will appear below that category. You can allow people to mention the role and see the entire server as it may appear to people with that role just to ensure they aren’t seeing anything they shouldn’t.
Step 7. Once the Role is created, you can add members to the role, assign them when they enter the server or create ‘Reaction Roles’ using bots like Dyno, Mee6, or any other alternative. We will surely explain how to create reaction roles in another post soon.
Once roles are assigned, people will be able to access channels and categories that are locked behind these roles.
2. How to Create Categories in Your Server
Your server can be divided into categories and channels. You can set up different categories and then add channels to those categories to keep the conversation streamlined and organized.
Dividing the server into these sections also allows you to control access. You can lock channels or categories behind ‘Roles’ to ensure some parts of the server aren’t visible to people without permission to access. Here’s a look at how to create categories:
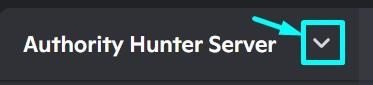
Step 1. Click on the downward arrow ‘v’ next to the server name. Make sure you’re on the server when you do this.
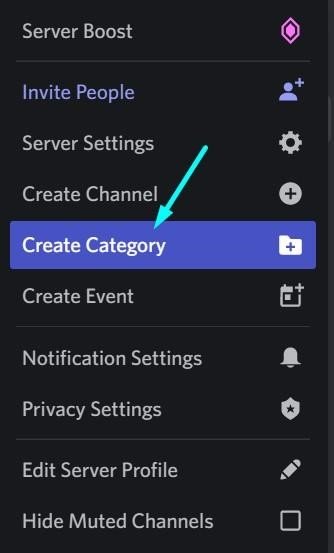
Step 2. From the dropdown menu, select the option of ‘Create Category.’ This allows you to create a dedicated category within your server.
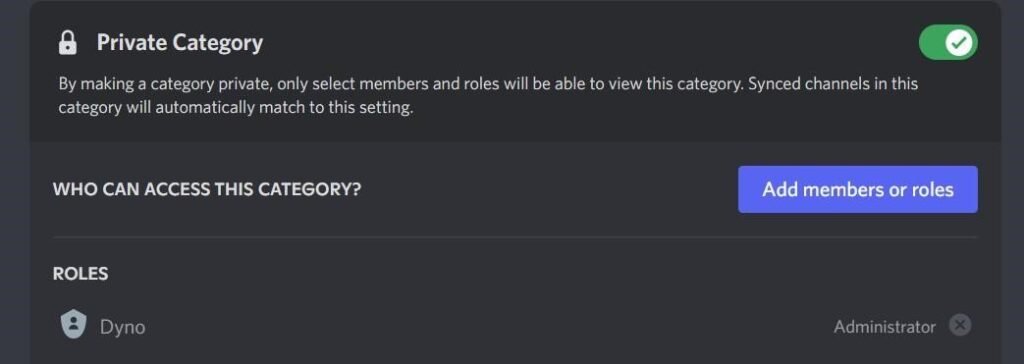
Step 3. Select the ‘Create Category’ option and add a ‘Category Name’ and decide whether you want to mark it as private. When you mark a category as private, it will only be available to the roles that are allowed to access it. The entire category will be hidden from people without the role.
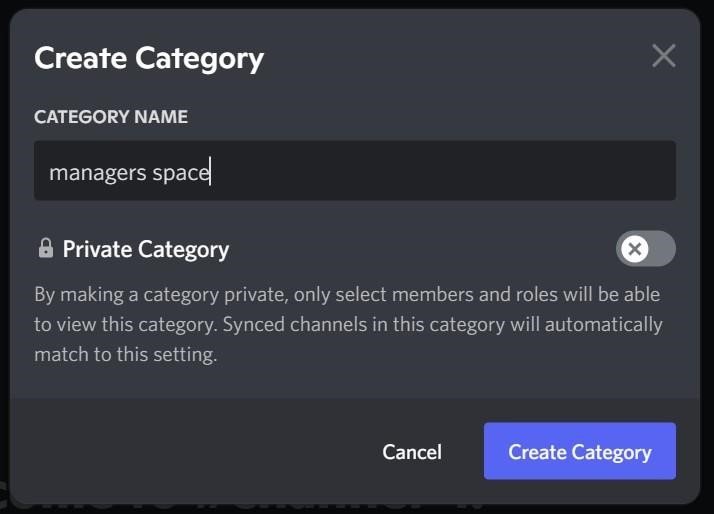
Step 4. If you toggle the option for ‘Private Category’ on, only people with the Role assigned to the category and the admins will be able to see it. You can also add individual members to the category to ensure only they can see the channels and content in it.
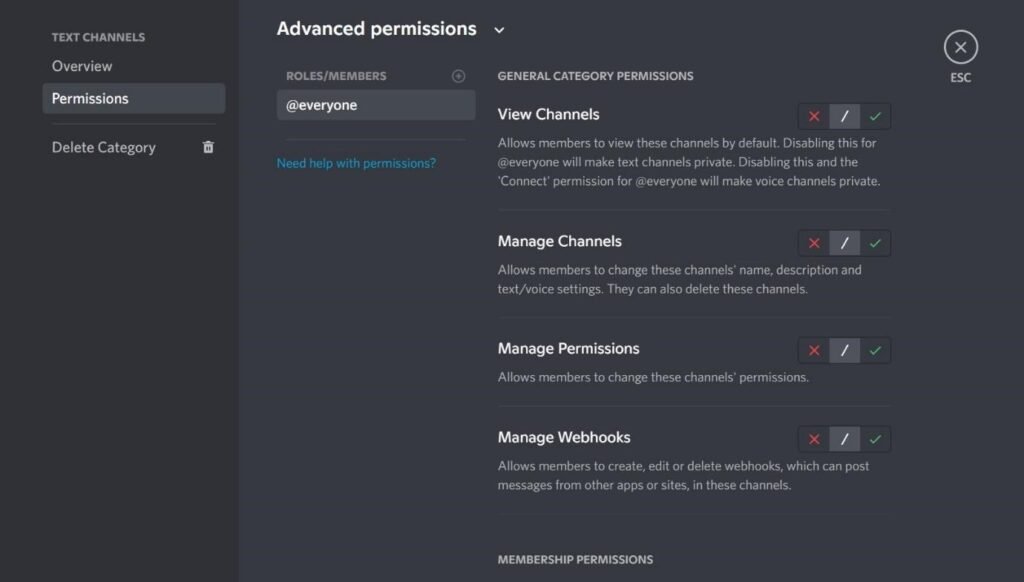
Step 5. You can set permissions for different categories as well. Browse through the permissions carefully before enabling them.
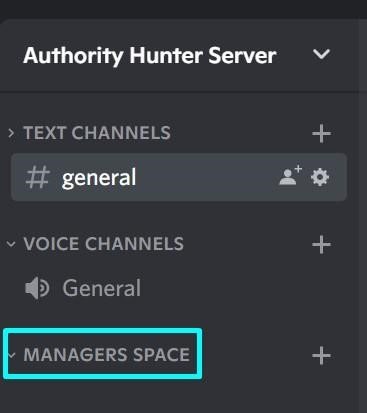
Step. 6. You can then click on save and see the new category appear on your channel list.
Once you have a category, you can also create channels under that category. If you want a more streamlined appearance, we recommend organizing and naming the categories with some thought and consideration.
3. How to Create Channels in Your Discord Server
Channels are where the conversations happen. You have two options when it comes to channels. You can create a few for text conversations or voice conversations. We will explain how to create both.
1. How to Create Text Channels
Step 1. Creating a Text Channel is easy. You just need to click on the (+) icon near your category name.
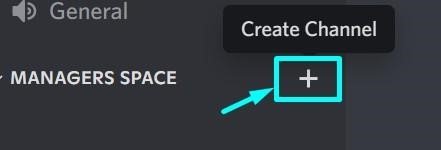
Step 2. There will be a pop-up box with options to create a Text or Voice channel. Choose the Text Channel option and enter the channel name in the space provided.
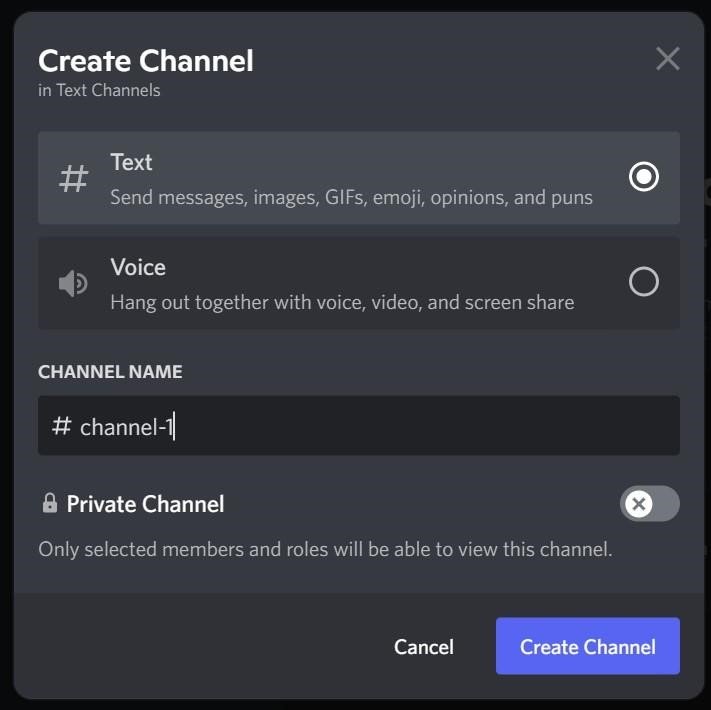
Step 3. You have the option to toggle the ‘Private Channel’ option on and restrict access to certain members or roles. For example, we can create a channel that only the ‘Manager’ role and the server admin can see.
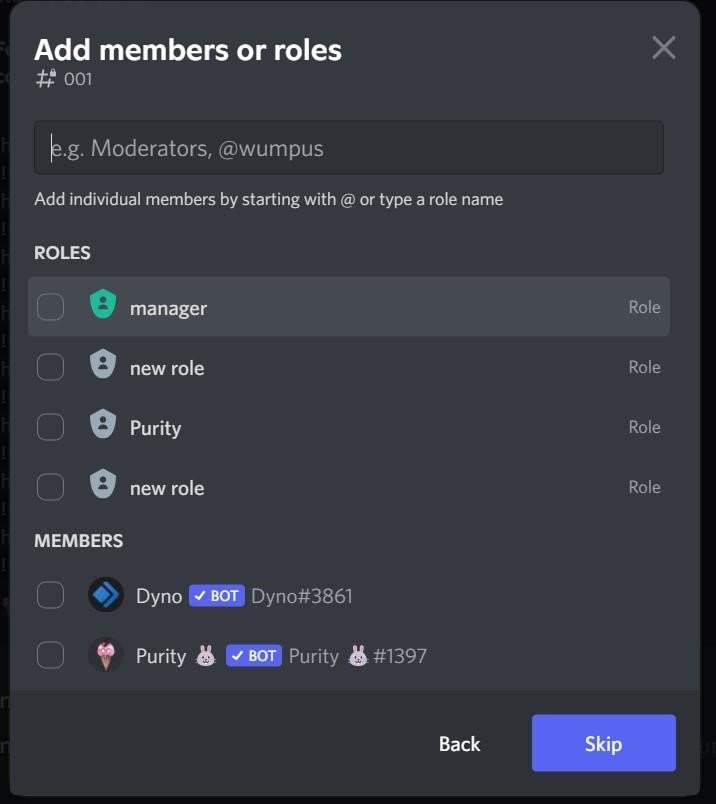
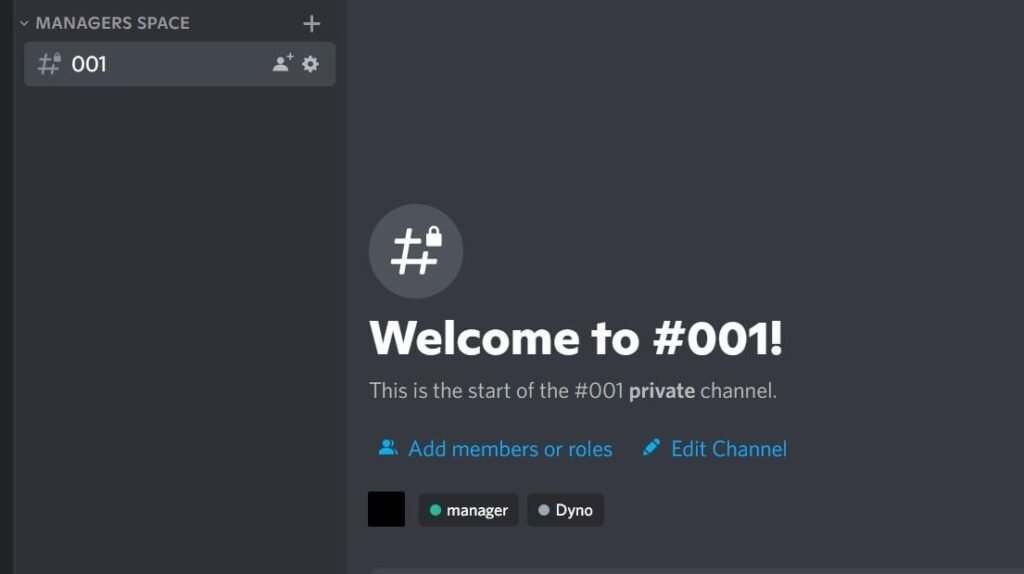
As you can see from the screenshot below, there is a new private channel with only ‘manager’ access.
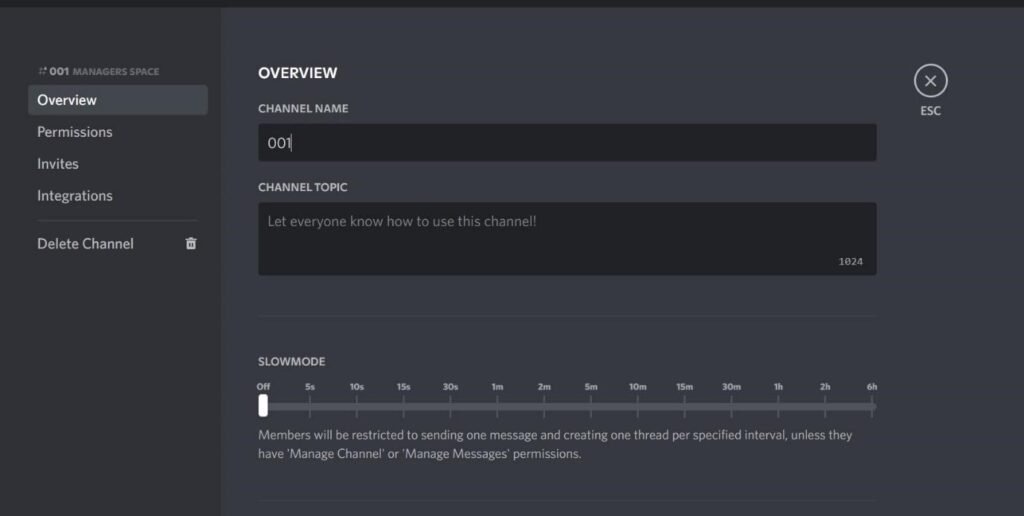
Step 4. If you want to edit any of the channel characteristics, you can click on the ‘Gear’ icon near the channel name.
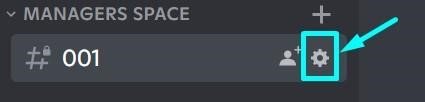
Clicking on the gear icon will open the channel editing and management page where you can alter everything from the channel name and description to roles and permissions.
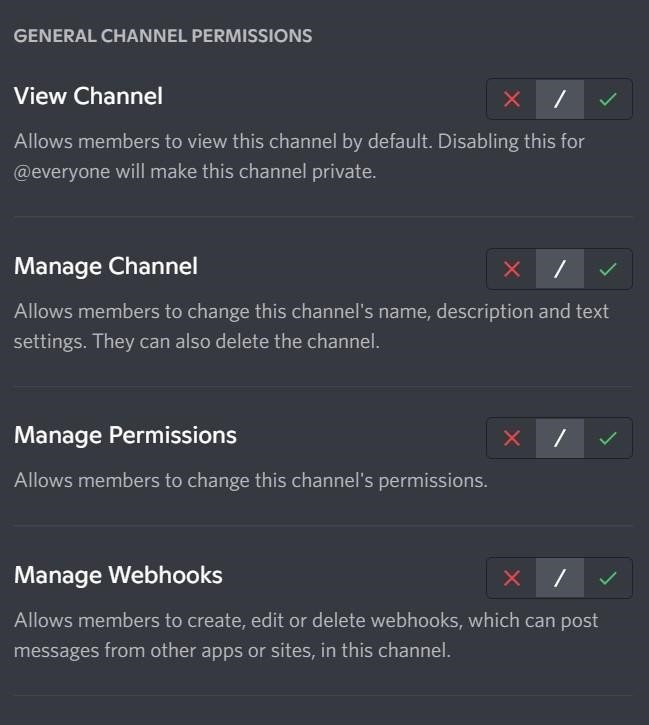
Step 5. The next step is to manage the permissions for the channel. If you already have permissions set for categories and roles, there is no need to do the same here as all permissions will sync. But if you want a channel to have specific permissions distinct from the category it is in, look at the permissions carefully.
You can click on the ‘Permissions’ option on the channel editing page to find the list of permissions.
Step 6. Once you have set the permissions, it is time to decide whether you want to make it an age-restricted channel or not. If you make the channel age-restricted, it is exempt from the Explicit Content filter that is implemented throughout Discord.
We have a post on NSFW in Discord and how the filters work. To enable age restriction, you just need to toggle that option as shown below.
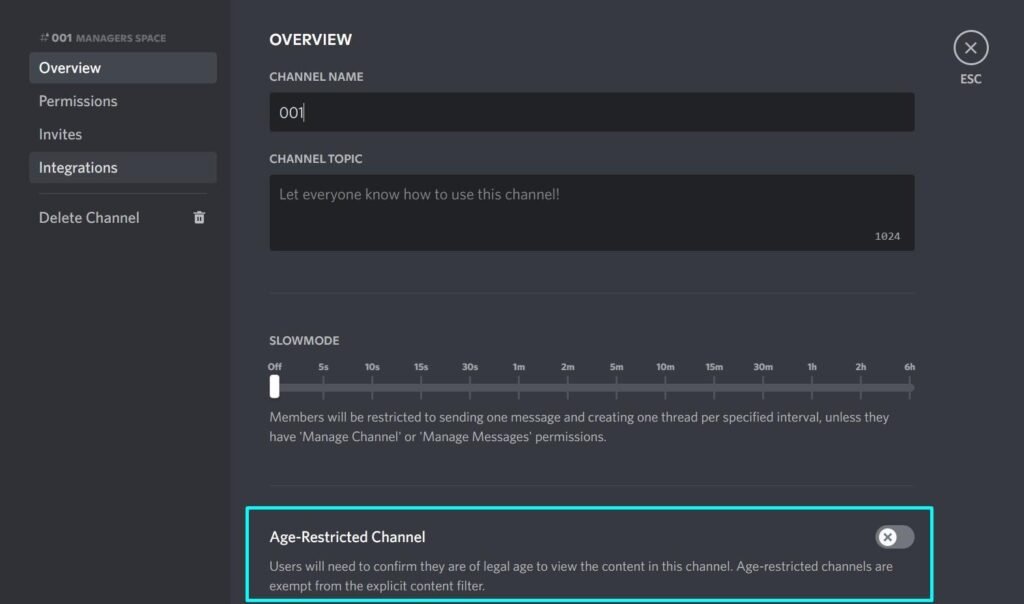
When you toggle it on, the channel will look like this when someone first enters it.
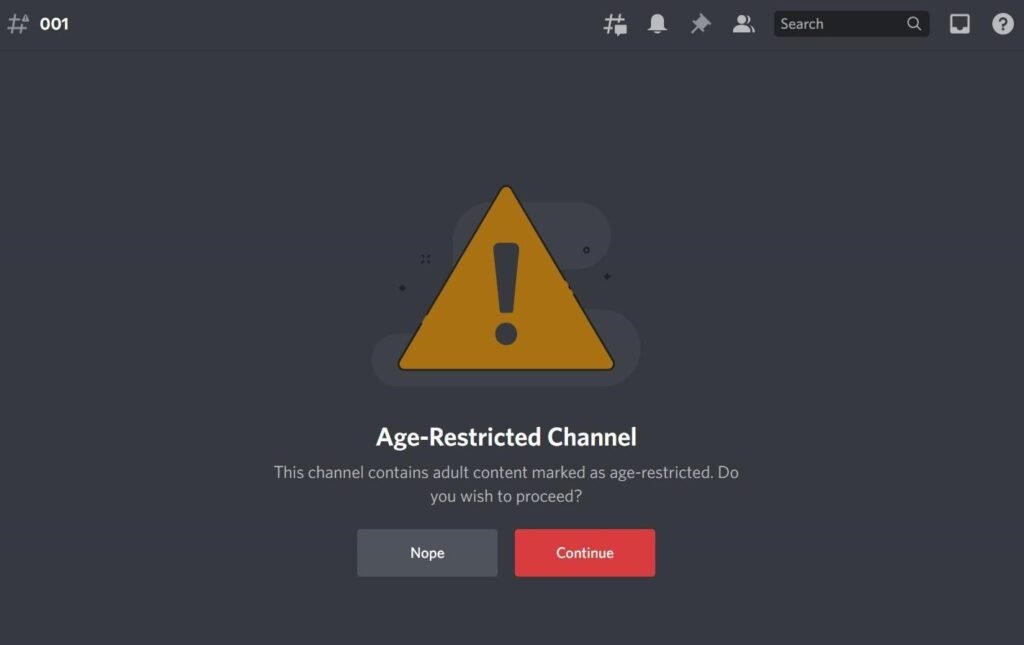
You just need to click on continue to access the channel’s content.
This is all you need to know to create a basic Discord server. Just starting at this point will help you become more confident and make you familiar with the platform. Then you can explore bots, moderation, community server settings, and more.
If you want to know more about Discord and its functions, don’t hesitate to explore our Discord category here at Authority Hunter.